Building a dynamic security infrastructure [in a box; with SDN]
Years ago I wrote about building a secure network in a box . Over a weekend I decided to revisit this concept thanks to a colleague at work wanting to do something similar. It got me thinking “a lot has changed since I last did this” and it felt like time to revisit it. Well, disappointment wasn’t in the cards because it’s easier, smarter, and more flexible now that it was back then. As I noted back in 2013 when I wrote that last post, OVS was a lot less well traveled and, frankly, there was not a reasonable controller that I could use in production for OpenFlow integration. I’ve since standardized on ProxMox for my lab and production virtualization and have espoused on every available occasion the usefulness of the Faucet SDN controller . Both play fundamental roles in this project. This is significantly easier than I expected - primarily due to the use of faucet for controlling the OVS switch. It’s fairly straightforward, so I won’t go into the step by step details here since the projects have good install and support docs. Proxmox has support for OVS, so just install it using apt and create an OVS switch in the GUI interface. Faucet has amazingly complete documentation and even a raspberry pi image (if you’re still thinking “OpenFlow is dead, isn’t it?”, have a listen to this podcast I did with Ivan Pepelnjak). From there, install a security option VM (or any other tool you want to capture data with). Once you have the OVS switch, the controller, and the VM up and running getting data to it is as simple as issuing the comments to configure a controller. I my case the command was:
sudo ovs-vsctl set-controller vmbr4 tcp:10.16.9.12:6653 tcp:10.16.9.12:6654
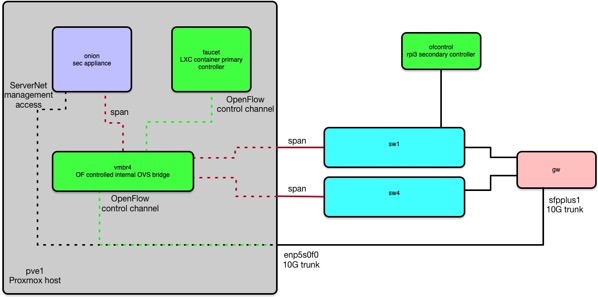
In my lab design the architecture was as such
 The two switches on the right are physical and span all uplink data via two physical ports into my proxmox host. Everything else is done virtually in OVS. Once you have the controller setup, the data coming in, and the host listening, you can validate you have the correct controller, interfaces and ports in ovs.
root@pve1:~# ovs-vsctl show
75b4bc7f-4e00-45c2-8919-b043cbaf509d
Bridge "vmbr4"
Controller "tcp:10.16.9.12:6654"
Controller "tcp:10.16.9.12:6653"
is_connected: true
Port "enx00051ba65ece"
Interface "enx00051ba65ece"
Port "tap115i1"
Interface "tap115i1"
Port "vmbr4"
Interface "vmbr4"
type: internal
Port "eno2"
Interface "eno2"
ovs_version: “2.7.0"
Listing interfaces in OVS can be a helpful way to aid in building the faucet configuration
root@pve1:~# ovs-vsctl --columns=ofport,name list interface
ofport : 65534
name : "vmbr4"
ofport : 1
name : "eno2"
ofport : 4
name : "tap115i1"
ofport : 2
name : "enx00051ba65ece"
For spanning the data into the VM, the basic configuration within faucet looks like this and should reside in /etc/faucet/faucet.yaml. The real meat here is the mirror statement on port 4.
dps:
    proxovs1:
        dp_id: 0x51ba65ece
        hardware: "Open vSwitch"
        interfaces:
            65534:
                name: "vmbr4"
                description: "ProxMox OVS vmbr4"
                native_vlan: servernet
            1:
                name: "eno2"
                description: "Span from sw1"
                native_vlan: servernet
            2:
                name: "enx00051ba65ece"
                description: "Span from sw2"
                native_vlan: servernet
            4:
                name: "tap115i1"
                description: "ProxMox OVS vmbr4"
                output_only: True
                mirror: [1,2]
This can be fairly easily adjusted to mirror all internal, east-west traffic in a virtualization farm.